Overview: Linux Boot Process Steps
🧠 Overview: Linux Boot Process Steps
The Linux boot process can be divided into six main stages:
BIOS / UEFI Initialization
When you power on the system, the BIOS (on older systems) or UEFI (on newer ones) performs:
Hardware initialization (CPU, memory, storage, peripherals)
POST (Power-On Self Test)
Locates and loads the bootloader from a bootable device (hard disk, USB, network, etc.)
The BIOS/UEFI then passes control to the bootloader (like GRUB).
Bootloader Stage (GRUB)
GRUB (GRand Unified Bootloader) is the most common Linux bootloader.
It provides a menu to select the OS or kernel version.
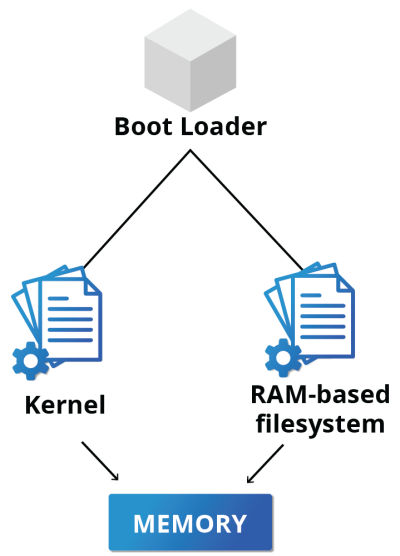
It loads the selected Linux kernel and the initial RAM disk (initramfs) into memory.
Configuration file:
/boot/grub/grub.cfg
Kernel Initialization
The Linux kernel takes control.
It:
Initializes core hardware components (CPU, memory, devices)
Mounts the initramfs (temporary filesystem in RAM)
Detects and loads device drivers needed for the real root filesystem
initramfs (Initial RAM Filesystem)
Temporary root filesystem used to prepare the system for mounting the real root filesystem.
Contains tools and drivers needed for booting.
Once the real root filesystem is ready, initramfs is unloaded from memory.
System Initialization (systemd / init)
The kernel starts the first user-space process — traditionally
/sbin/init, now oftensystemd.systemdhandles:Starting essential background services (network, logging, etc.)
Mounting filesystems
Managing system targets (like multi-user, graphical, etc.)
Default target configuration file:
/etc/systemd/system/default.target
User Space / Login
Once all services are started:
You’re presented with a login prompt (CLI or GUI)
The desktop environment (like GNOME, KDE, XFCE) loads if it’s a graphical target
You can now interact with the system normally.
🧩 Simplified Boot Flow
Power On
   ↓
BIOS/UEFI
   ↓
Bootloader (GRUB)
   ↓
Kernel + initramfs
   ↓
System Initialization (systemd)
   ↓
User Login (CLI/GUI)
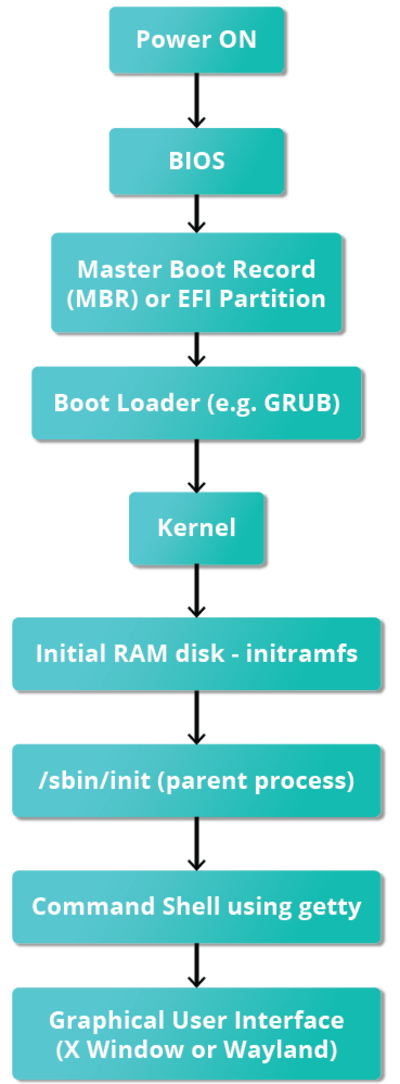
🧩 Linux Boot Process (as shown in your diagram)
Power ON
- The computer is powered up; hardware components are energized.
BIOS
Performs POST (Power-On Self-Test).
Locates a bootable device.
Hands control to the MBR (for BIOS systems) or EFI Partition (for UEFI systems).
Master Boot Record (MBR) / EFI Partition
Contains information about partitions and the bootloader location.
Points to the Boot Loader (like GRUB).
Boot Loader (GRUB)
Loads the Linux kernel and initramfs into memory.
Lets you choose between OSes or kernels if multiple are installed.
Kernel
- Initializes hardware, mounts
initramfs, and starts the init process.
- Initializes hardware, mounts
Initial RAM Disk (initramfs)
- Temporary filesystem that helps load essential drivers and mount the real root filesystem.
/sbin/init (Parent Process)
The first user-space process (PID 1).
Starts all other services.
In modern systems, this is usually
systemd.
Command Shell (via getty)
Provides login prompt (for CLI access).
You can log in and interact through the shell.
Graphical User Interface (X Window or Wayland)
If a desktop environment is installed, it loads here.
The user sees the graphical desktop (GNOME, KDE, etc.).
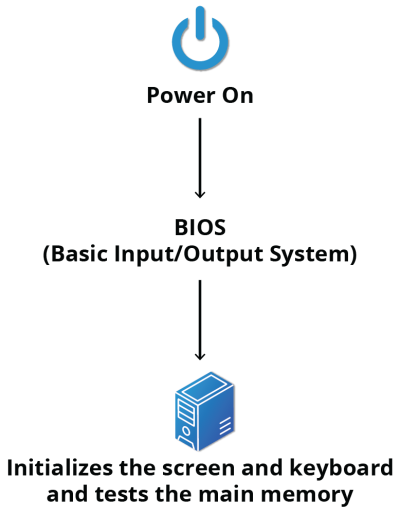
🧠 BIOS – The First Step
When you power on an x86-based Linux system, the BIOS (Basic Input/Output System) is the first program to run.
It performs the POST (Power-On Self Test) to check and initialize hardware components like memory, keyboard, and display.The BIOS, stored on a ROM chip on the motherboard, ensures the system hardware is ready and then locates a bootable device. Once this is done, it hands control over to the operating system to continue the boot process.
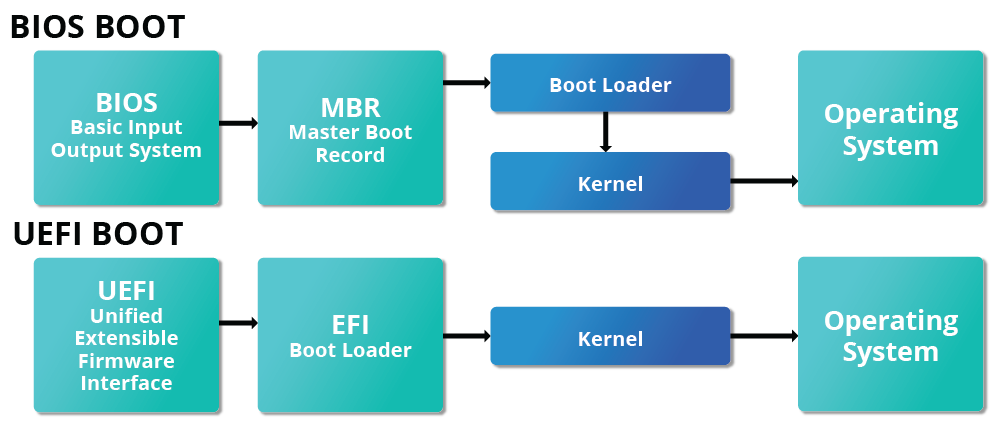
💽 Master Boot Record (MBR), EFI Partition, and Boot Loader
After the POST completes, control passes from the BIOS/UEFI to the boot loader.
The boot loader resides on a storage device—either in the boot sector (for traditional BIOS/MBR systems) or the EFI partition (for modern UEFI systems).
At this stage, the system retrieves essential hardware settings like date, time, and device info from the CMOS memory, which retains data even when powered off.
Common Linux boot loaders include:
GRUB – GRand Unified Boot Loader (most widely used)
ISOLINUX – for booting from removable media
DAS U-Boot – for embedded systems
The boot loader’s main tasks are to:
Present a menu for selecting OS or kernel options.
Load the Linux kernel and initial RAM disk (initramfs) into memory.
Hand control over to the kernel to continue system startup.
🧩 Stage 1 – Initial Boot Loader
On BIOS/MBR systems:
The boot loader is stored in the first 512 bytes of the hard disk, known as the Master Boot Record (MBR).
It checks the partition table to locate a bootable partition.
Once found, it loads the second-stage boot loader (e.g., GRUB) into RAM.
On EFI/UEFI systems:
The UEFI firmware reads the Boot Manager configuration to determine which UEFI application (like GRUB) to start and from which EFI partition.
This modern method is more flexible and powerful than the traditional MBR approach.
🧩 Stage 2 – Full Boot Loader (/boot)
Located in the /boot directory.
Displays a splash screen or menu, allowing users to select:
The operating system or
A specific kernel version to boot.
Once selected, the boot loader:
Loads the kernel into RAM.
The kernel decompresses itself (since it’s stored in a compressed format).
Initializes hardware and loads built-in device drivers.
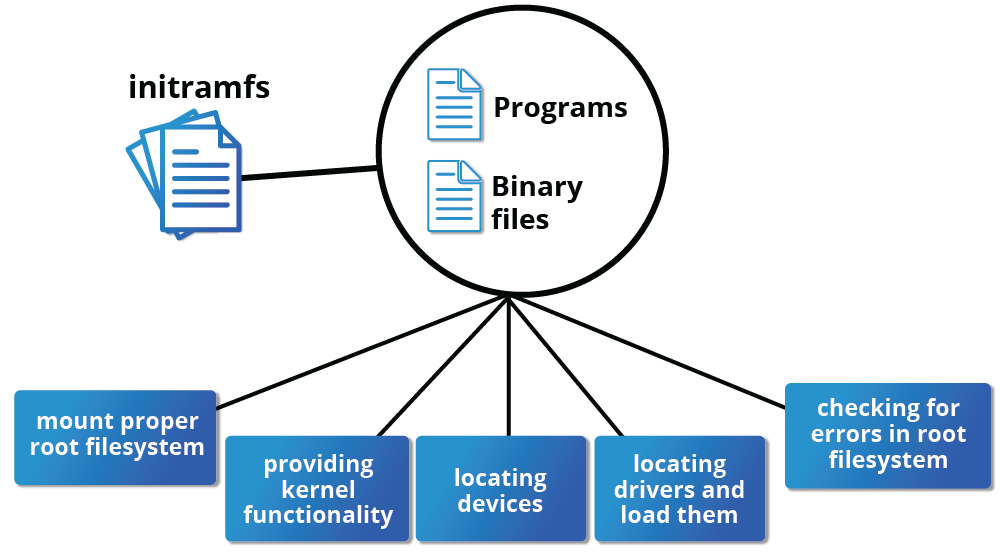
🧩 The Initial RAM Disk (initramfs)
The initramfs (initial RAM filesystem) is a temporary, in-memory filesystem that plays a crucial role in the Linux boot process. It bridges the gap between the boot loader and the real root filesystem.
⚙️ Key Functions
Contains essential programs, binaries, and drivers needed to:
Detect and mount the actual root filesystem.
Load necessary kernel modules (e.g., storage or filesystem drivers).
Use the udev system to identify connected devices and load appropriate drivers.
🧠 How It Works
The kernel loads the initramfs into RAM (provided by the boot loader).
The udev system detects available devices.
The mount program mounts the correct root filesystem.
The filesystem is checked for errors and then made ready for use.
Once the real root filesystem is active:
The initramfs is cleared from RAM to free memory.
The init process (
/sbin/initorsystemd) starts, continuing the system startup.
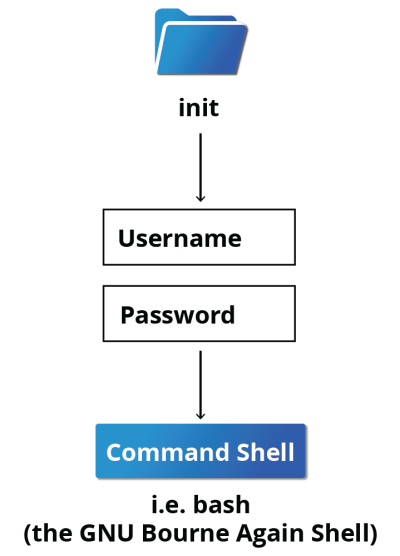
💻 Text-Mode Login
As the Linux boot process nears completion, the init process (or systemd) launches several text-mode login prompts on different terminals.
These allow users to log in by entering their username and password, after which they are given access to a command shell.
🧩 Accessing Terminals
On systems with a graphical interface, you might not see text logins by default.
To switch between them:
Text consoles:
Ctrl + Alt + F1toF6Return to GUI:
Ctrl + Alt + F7(orF1, depending on the distribution)
Most Linux systems start six text terminals and one graphical terminal.
🧠 Shell Environment
The default command shell is usually bash (Bourne Again Shell).
The shell:
Displays a prompt to indicate readiness for input.
Accepts and executes commands typed by the user.
Returns a new prompt when the command finishes.
🧠 The Linux Kernel
Once the boot loader finishes its job, it loads two critical components into memory:
The Linux kernel itself, and
The initial RAM filesystem (initramfs).
⚙️ What the Kernel Does
After being loaded into RAM, the kernel takes full control of the system. It performs several essential tasks:
Initializes and manages system memory
- Allocates and organizes memory for processes and the OS.
Detects and configures hardware
- Identifies and sets up CPUs, storage devices, I/O controllers, and peripheral devices.
Loads essential drivers and user-space helpers
Ensures hardware can communicate properly.
Starts key user-space applications (like
initorsystemd) to continue the boot process.
⚙️ /sbin/init and Services
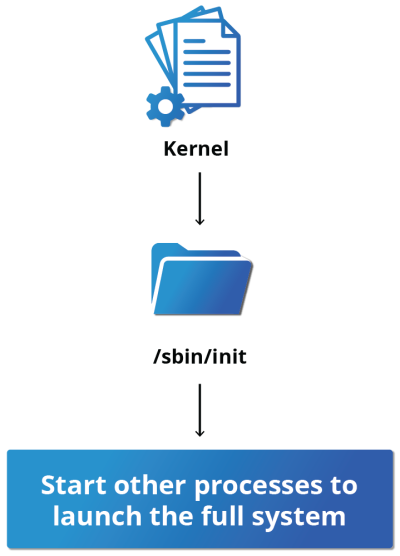
After the kernel initializes the hardware and mounts the root filesystem, it starts the very first user-space process — /sbin/init.
This process becomes the parent of all other user-space processes, except for a few kernel threads created directly by the kernel.
🧠 Role of init
Starts essential system services to bring the system into a usable state.
Monitors and manages processes, restarting or cleaning them up when they finish.
Handles system shutdowns and reboots, ensuring everything stops cleanly.
Restarts login services when users log out, maintaining continuous system operation.
🏗️ From SysVinit to Modern Systems
Traditionally, Linux used SysVinit, a sequential startup system derived from UNIX System V.
It organized startup into runlevels, each defining a specific mode (e.g., single-user, multi-user, graphical).
Each runlevel executed a series of shell scripts to start or stop services.
However, this serial process was slow and difficult to parallelize.
🚀 Modern Replacement – systemd
Most modern Linux distributions now use
systemdinstead of SysVinit.systemd:
Starts services in parallel, greatly speeding up boot time.
Uses targets (instead of runlevels) to define system states.
Provides powerful tools for monitoring and managing services (
systemctl).Maintains backward compatibility with many old SysV-style scripts.
⚙️ systemd Features
systemd is the modern initialization and service management system used by most Linux distributions today.
It significantly improves system startup speed, reliability, and manageability compared to older init systems.
⚡ 1. Faster Boot Times
systemd replaces the sequential startup of SysVinit with parallel processing.
Multiple services start simultaneously, reducing overall boot time.
Dependencies are managed intelligently, ensuring services start in the correct order.
🧩 2. Simplified Configuration
Instead of complex shell scripts, systemd uses simple configuration files (called unit files).
These files define:
What dependencies a service has.
How the service starts and stops.
What signals indicate successful startup.
The
/sbin/initbinary now points to/lib/systemd/systemd, meaning systemd completely replaces init.
🧠 3. Unified Management with systemctl
systemd introduces a single, powerful command — systemctl — to control services and system states.
Examples:
| Task | Command |
| Start, stop, or restart a service | `sudo systemctl start |
| Enable or disable a service at boot | `sudo systemctl enable |
| Check service status | sudo systemctl status httpd.service |
💡 Note: You can usually omit “
.service” at the end of the command.
🧰 4. Other Advanced Features
Socket activation – starts services only when needed.
Logging integration – works with
journaldfor centralized log management.Target-based startup – replaces runlevels with more flexible “targets.”
Resource control – manages CPU and memory usage using cgroups (control groups).
🧠 Step-by-Step Commands
Check if Apache is running
$ sudo systemctl status httpdIf it is running, stop the service
$ sudo systemctl stop httpdVerify that it has stopped
$ sudo systemctl status httpdStart the Apache service again
$ sudo systemctl start httpdConfirm that it is running
$ sudo systemctl status httpd(Optional) Stop it again when finished
$ sudo systemctl stop httpd